
Scheduled Downtimes for Maintenance
Customer Advantage is an Internet web page application designed to allow customers to get price quotes, place orders, and trace their shipments. Soon they will also be able to obtain images of their bills of lading and/or proofs of delivery online.
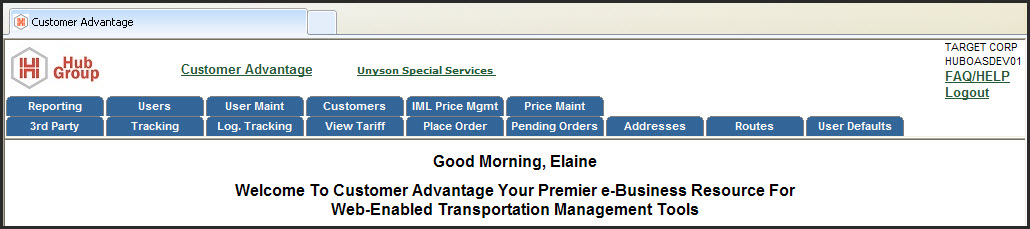
After logging in, a Welcome Page is displayed with a personal greeting in the top of the message area. Under the greeting, the left side of the screen contains General Information about Customer Advantage. It is here that notification of changes to the Customer Advantage application are described. On the right side, the screen displays a Customer Advantage functionality summary. Both these displays have bars to the right of the area which the user can use to scroll down to read all the text in that area.
Phone: 1-877-770-9250
e-mail: CASupport@hubgroup.com
Begin by opening your browser. After the home page has loaded, highlight the text contained in the box at the top of the browser labeled 'Address' or 'URL'. Delete all text from the box and type in the Internet address for Our online system.
It is important that you observe the punctuation carefully. There is a colon (':') after the http, followed by two forward slashes (//, not \\). Separating each of the words in the Internet address is a simple period ('.'). Spelling counts, but capitalization does not.
is the same Internet address as
By convention, Internet addresses are typed in all lowercase letters.
Once you correctly type the address and hit Enter, Our Home Page appears.
Logging In to Customer Advantage
On our Home Page you will notice a Fast Track Login menu option on the top of the screen. Click this and it displays several options, the first of which is 'Customer Login'. Click on this link to log into the Customer Advantage system. After a pause you will be presented with a login dialogue box. Type your User ID into the first field and your password into the second field. Click OK. You will be presented with the Customer Advantage Home Page. The Customer Advantage Home Page displays all the Navigation Tabs and a "Welcome Screen" with tips for using Customer Advantage and information about the most recent changes to the application.
Why Doesn't My Login Work?
Following is a list of reasons why you may not be able to log into the system.
| What Happens |
|
After attempting three times to log in, you are presented with a page containing the following text:
|
| What to do about it |
|
Return to the login page. If you feel you have entered an incorrect user id, try again. If you are unable to access the system again, you can take one of the following options.
Select the "Forgot User ID" link. The system will prompt you for your e-mail address. If your e-mail is in the Customer Advantage system, you will be sent a list of any user id's you have on the system, along with the customer for which the id is signed. You may then sign in again, using the correct id. If you have forgotten your password, but have your user id, click the "Forgot Password" link. The system will prompt you for your user id and e-mail address. If your e-mail address matches the one in our database for that user id, you will be sent a new randomly created password. You can use that new password to login. You may change it after logging in, if desired, or you can continue to use the system generated password. Remember all passwords are case sensitive. If these options don't work, it is probable that your e-mail address has changed since you last registered. You will need to have someone manually update your information and reset your password. Do this by contacting your local Customer Administrator or by contacting the Customer Advantage support team by phone at 1-877-770-9250 or by e-mail to CASupport@hubgroup.com |
|
Why are User IDs disabled?
The reasons for user becoming disabled are:
|
To Change your password, supply your old password, and then type in your new password twice. (This reduces keying errors.) Your password is case-sensitive, so 'NEWPASSWORD" is not the same as 'newpassword'. This is helpful in keeping your password more secure, but can pose problems if you are not careful with your 'Caps-Lock' key.
| Your password must be at least six characters in length. Numbers, letters, '@', '.' , '-', and '_' are valid characters. |
| Your password must not be the same as your User ID. |
| You will not be permitted to 'Change' your password to its current value. |
| You must enter identical values into the two 'New Password' fields. |
Additional help can be obtained by clicking on the yellow "FAQ" hot spots that are positioned near various headers or fields throughout The Customer Advantage screens. Clicking on these buttons will display frequently asked questions about those fields and show the answers that will add more information about those fields.
The multi search tool does not work in conjunction with the advanced search feature. It only searches for matches based on the criteria entered in the 10 fields on the search screen. Only one type search may be submitted at a time. For example, a search for 2 trailer numbers and 2 bills of lading could not be submitted at the same time.
| Detail | Clicking on the magnifying glass icon will display a table that contains all the known details about the shipment selected. Details include the following items |
| Docs | Clicking on the paper icon in this column will display the "Paperwork Availability" window. In this window, the user can click on the Bill of Lading/Proof of Delivery link or Scale Tickets link. These links will display the Transflo.com web site with a list of bills of lading and/or proofs of delivery available for this order or the various scale tickets available for the order. |
| Trailer # | The identifier assigned to the equipment for this load. |
| Shipper Order # | The Customer Shipping Order number associated with the shipment. For the account of Unilever only, this will be the Shipper ID number. |
| BOL # | Customer Bill of Lading number associated with the shipment. If more than one Bill of Lading for the shipment, there is a link that will display a popup window containing all the bills of lading associated with the shipment. |
| Pro # | The system generated number associated with the shipment. The default sort for this table is based on this number in ascending order. |
| Cust. Ref. | The Customers Reference Number, identified as a "CR" reference in our system. |
| SI# | The Shipper's Identifying Number, identified as an "SI" reference in our system. |
| DO# | The Delivery Order Number, identified as a "DO" reference in our system. |
| Origin | City, State, and Zip code of pick up location. |
| Ship Date | Date of pick up from shipper. |
| Destination | City, State and Zip code of delivery location. |
| Delivery Appt | The date and time for the scheduled delivery appointment. |
| Status / Location |
The Movement Status for the shipment is based on the "current location" of that shipment. It is shown in the first line. The second line contains the city and state from which this status was reported. The third line contains the last reporting date and time from our internal system. Statuses reported in the Shipment Summary (along with their id) are:
|
| ETA | This field contains the estimated date and time when this shipment will arrive at the destination ramp. This is calculated, based on comparing the current movement activity against previous history for the same point-to-point movements. This historical data is reevaluated weekly. |
| Sorting Arrows | At the top of certain columns, there are arrows that the user may click to sort the data based on entries in that field. The active sort is designated by a gold colored arrow. |
| Next Button | Clicking the next button displays the next page of shipments that were selected in your search criteria. |
| Download Button |
Clicking the download button will provide an Excel formatted report of all shipments included in your search selection.
Note: After clicking the download button, you may be required to re-enter your user password. Follow the instructions in the dialogue box and then stand by while the download completes. This may take a little time. You will then be prompted to save this file to disk or to open it in its current location. Once the file has downloaded, click the 'Open' option to automatically display the detailed information of each individual load in an Excel file. Customer now has ability to use Excel properties to sort and manipulate the data as needed. |
| BOL # | Number assigned to the bill of lading by the shipper. If there are multiple Bill of Lading Numbers related to the shipment, clicking on the text link will display a popup window with a list of all the associated BOLs. |
| PO # | Purchase Order Number attached to the shipment by the consignee. Number is contained on the shipping papers at point of origin. If there are multiple PO Numbers related to the shipment, clicking on the text link will display a popup window with a list of all the associated POs. |
| Shipper Order # | Number assigned to the bill of lading by the shipper. Some shippers use both a Shipper Order number and a Bill of Lading number. Other shippers use one or the other interchangeably. |
| Web Order # | An internal number assigned to an order received by the company from the Customer Advantage Web Application. |
| Trailer Number | The identifier assigned to the equipment for this load. |
| Selling Hub | The office that controls the order |
| Trans Mode | The Transportation Mode (Intermodal, Over the Road) |
| Sub Mode | For Over-the-Road moves, denotes van, flat or reefer equipment. For Intermodal Moves, denotes a dropped trailer. |
| Pickup # | A number assigned to a shipment by the shipper that allows the carrier and shipper to easily identify the order being shipped. |
| CR Number #1 | The Customer Reference number associated with this shipment. |
| SI Number #1 | The Shipper's Identifying number associated with this shipment. |
| DO Number #1 | The Delivery Order number associated with this shipment. |
| Pro # | A system assigned number for the order being shipped. |
| Seal # | The number on the device used to close a trailer and prove that entry has not been made to the shipment since it was sealed. |
| Vessel Name | The name of the ship on which a container is being transported. |
| Booking # | The number assigned to an ocean-going shipment that identifies it at point of delivery. |
| Voyage # | The number assigned to the sailing voyage of the vessel that will be transporting the container. |
| Service Type | A description of the service being provided to the customer by the company on this order. |
| IT or TE # | The number assigned to import or export shipments for customs purposes. |
| Int'l In-Care-of Party | The name of a party handling an international shipment, for purposes of notification. |
| Origin and Destination Ramps | The identifier codes for the ramps where a rail shipment originates or terminates. |
| Ship Date | The date a shipment was picked up. |
| ETA | Estimated Date and Time the freight will be available for pick up, based on historical shipping transit data for that specific point-to-point. |
| Delivered Date | The date a shipment was tendered to the final consignee for delivery. |
| Commodity, Pieces and Weight | Use the pull down arrow to display options and select the one that matches the commodity being shipped on the route. This sets a default that can be Changed for future orders. |
| Equipment Type | A description of the type equipment, i.e. trailer or container. |
| Equipment Length | The required length of the equipment in feet, where the most commonly used lengths are 20, 40, 48, and 53 foot lengths. |
| Equipment Prefix | The 4 character ALPHA prefix that denotes where the equipment is to be obtained. |
| Equipment Width | The required width of the equipment to be used for the shipment. |
| Origin Stop 1 | The name and location of the shipper. |
| Origin Contact Information | Name, phone number and/or fax number and/or e-mail address of party to be contacted regarding pickup of the shipment. |
| Appointment from and Appointment to | The window for pick up of the shipment (In-Service Date) |
| Destination Final Stop | The name and location of the ultimate consignee. |
| Destination Contact Information | Name, phone number and/or fax number and/or e-mail address of party to be contacted regarding delivery of the shipment. |
| Appointment from and Appointment to | The window for delivery of the shipment |
| Route | The ID codes of the dray carriers and rail moving the shipment. |
| Transfer Points | The locations where freight is Changed from one carrier to another. |
| Events |
Activity reported to us by dray men and rails. The following events are reported.
|
| Paperwork Availability for Shipment # | This section of the window lists any documents that are available for the user to view and request. A message here directs the user to select the "Request Paperwork" button if the desired document type is not listed. |
| Paperwork Type |
Clicking on these links displays the Transflo.com web site where the user will see those documents available to view and request.
Options include
Clicking on the link will display the selected document in a separate window. The user can print, zoom, or rotate the document to get the best view of the desired information. All other paperwork types must be requested from the company via e-mail. |
| Request Paperwork | Clicking on this button displays a "Paperwork Request" screen. This screen displays User Information and Paperwork types. More details on this screen is shown in the next table. |
| Close | Clicking on this button will close the Paperwork Availability window and return the user to the Tracking screen. |
| Tiff link | Users who have Microsoft® Windows 2000, Windows NT or Windows XP should attempt to use the Image Viewer supplied with their computer's operating system. However, users of operating systems that are older than this, i.e. Microsoft® Windows 95 or Windows 98, will probably need AlternaTIFF software on their PC to view and download documents from the Transflo (Pegasus) web site. A link is displayed on this screen where the user can download this free software onto their machine. Just click and follow the instructions that will be shown on the screen. There are some conflicts between imaging software on some machines. If you have any problems, contact Hub Customer Advantage Support at 1-877-770-9250 . | Support Information |
If the Paperwork Availability window indicates that there are available documents, but the user clicks the link and there are no links visible, the user is instructed how to contact our documentation department for assistance.
Call 1-630-795-2400. |
The popup window that is displayed when the user clicks on the "Request Paperwork" button contains two areas--User Information and Paperwork Types. These are explained further in the following table.
| User Information |
A form that is populated by the system from the user's registration. This is the default location where the requested documents will be e-mailed or faxed. Information included in this area are:
All fields are required. In addition this area contains a check box where the user can click to indicate a desire to have the requested paperwork sent to another party. This will expand this display to include Contact Information |
| Contact Information |
A form that is populated by the user to direct copies of documents to another party. Information included in this area are:
Again, all fields are required. |
| Select or Enter Paperwork |
Clicking on the desired paperwork types will place a check in the box before the type. This will indicate to the company customer service representative what documents you need that were not available to you on the Transflo web site. Various document types that may be available (based on requirements for an individual shipment) include:
|
| Submit | Clicking on this button will send an E-mail request to the our customer service department, where it will be processed and documents will be sent back via E-mail to the User or Contact (as requested). |
| Clicking on this button will print a formatted fax request on your local printer. This fax can then be faxed, at your convenience, to the individual shown at the top of the form. | |
| Close | Clicking on this button will close the Paperwork Request Form and return the user to the Tracking Window without making any requests |
The multi search tool does not work in conjunction with the advanced search feature. It only searches for matches based on the criteria entered in the 10 fields on the search screen. Only one type search may be submitted at a time. For example, a search for 2 TM Load numbers and 2 Reference Numbers could not be submitted at the same time.
This selection allows the user to complete one or more filter fields and press "submit" to search all Shipments or Loads with a ship date in the last 120 days and then display only those shipments that meet the search criteria. If a user keys in partial text or numbers, the system will return all values that start with the "keyed characters".
Available filter fields are:
| Links |
When a shipment is moving via certain carriers, such as Roadway Express, this column can contain two text links: "Document" and "Track". Selecting one of these links will open a second window with the corresponding application on another carrier's web site, allowing the user to view any available paperwork or tracking information for that shipment. If the viewer chooses to print the document or tracing information in the popup window, they can right click on the window and choose the Print option on the menu. They can also click on the "File" option in the menu bar at the top of the window and select the Print option there. Note that for a couple of carriers, it is necessary to key in the carrier pro number once their screen is displayed. This will then retrieve the requested information.
The first links created were for Roadway Express and USF Companies. Other carriers have been added to this feature. Some have only tracking ability and others have tracking and documentation abilities. Clicking here will display the table that contains the current carriers who are linked to our site. |
|
| Docs | Clicking on the Docs icon will display the Paperwork Request for Logistics Shipments form in a separate window. Here the user can complete the form, selecting the type paperwork required and submit the request. Currently this option is only available for one customer. | |
| Shipment # | Clicking on the Shipment # text will display the Logistics Shipment Details screen. Descriptions for this screen may be found in the Logistics Shipment Details section. (This column was called the TM Shipment #) | |
| Load # | Clicking on the Load Number text will display the Logistics Load Details screen, where the user can review details of load. Also on this screen are the Events that have been entered for this load. Descriptions for the Logistics Load Details screen may be found in that section. (This column was called the TM Load #) | |
| Carrier & Carrier # | The four character SCAC for the Carrier that was assigned to handle this shipment, followed by the carrier's pro number, if any. This pro number will be shown on the 2nd line in this field. | |
| Trailer # | The identifier characters assigned to the trailer / container moving this order. | |
| Origin | The city, state and zip where the shipment originates. | |
| Req Pickup Date | The date when pickup is requested. | |
| Act Pickup Date | The date when pickup is actually made. | |
| Destination | The city, state and zip where the shipment terminates. | |
| Req Del Date | The date when delivery is requested. | |
| Act Del Date | The date when delivery was actually made.. | |
| Status | The status of the shipment. These are the same statuses as listed above for the Logistics Load Details screen. | |
| PO # | The Purchase Order number associated with this shipment. | |
| Cancel Date | The date an order was cancelled if applicable. | |
| Customer Status (displayed only for users with authority to United Stationers) |
The Uniform Shipment Status code. These cover cancellation, delivery/pickup and temporary statuses as follows:
|
|
| Additional Reference Numbers | Individual Customers have custom designed Reference Numbers displayed on their Summary page. These are used by the customer and their values are known to them. | |
| Previous/Next Buttons | Clicking on these buttons will allow the user to navigate from one page to another. Only 10 shipments are displayed on a screen. | |
| Back to Search | Clicking this button will return the user to the "Logistics Shipment Tracking" screen. | |
| Download Loads | Clicking this button will display the File Download Wizard. Here the user can opt to download the Load File to a file location on his computer, or can download the file and open it. It is advised that the user download to his computer. Follow the instructions in the dialogue box to complete the download. | |
| Status |
The status of the shipment being viewed. Valid Statuses are:
|
| TM Shipment # | The identifier number for the load to which this shipment is assigned. |
| Bill of Lading Number | The Bill of Lading Number assigned to this shipment. |
| Carrier | The name of the Carrier that was assigned to handle this shipment. |
| Carrier Pro Number | The number the Carrier has assigned to this shipment. |
| TM Shipment # | Our system generated number associated with the shipment. |
| P O Number | The Customer's Purchase Order Number for the shipment. |
| Order Number | Another reference number associated with the shipment. |
| Work Order Number | A number provided to us by the customer. |
| Service | Type service requested: LTL - less-than-truckload or TL - Truckload (Over the road) |
| Trailer Number | The identifier number of the equipment moving the shipment. |
| Commodity | A description of the material being shipped. General Commodities is the most common description. |
| Pieces, Weight and Cube | The pieces in units, weight in pounds and the area in cubic feet for the shipment. This information is provided by the customer at time of order placement. |
| Customized customer reference numbers. | Any additional reference numbers required by various customers. This would include the Return Authorization numbers (RA), Invoice Numbers, etc. as requested. |
| Other special fields may appear here, depending upon customer requirements. Three examples follow. | |
| Dealer Name | The name of the dealer from whom the merchandise was ordered. |
| Sold Account Number | An internal customer accounting number of the account to whom the merchandise was sold. |
| Ship Account Number | An internal customer accounting number of the account to whom the merchandise was originally shipped. |
| From | The Name and Address of the location where the shipment will be picked up. |
| Contact | The name, telephone number and fax number of the party at the shipping point who can provide information to the carrier. |
| Appointment From: / Appointment To: | The beginning time and ending time of an appointment window that was already set at the time of order entry. |
| To | The Name and Address of the location where the shipment will be delivered. |
| Contact | The name, telephone number and fax number of the party at the delivery point who can provide information to the carrier. |
| Appointment From: / Appointment To: | The beginning time and ending time of an appointment window that was already set at the time of order entry. |
| Memo | Any remarks that were included with the shipment at time of order entry. |
| Again, customized information may be displayed here, as required by individual customers. An example follows. | |
| Order Item | A listing of all items included in the logistics order for that shipment. This displays the Item number, description, quantity, unit weight, unit return value and reason code, as keyed by the customer. |
| Go Back Button | Clicking on this button will return the user to the Logistics Summary Page, where other shipments or loads can be chosen for detailed display |
| Status |
This shows the status of the load in the TM system. Valid statuses are:
|
| TM Load # | The system assigned number for one or more shipments that have been designated to ship on one trailer. |
| Selling Hub | The four character identifier for the office that handles pricing and tracing for the customer who placed the order. |
| Carrier | The name of the Carrier that was assigned to handle this shipment. |
| Service | Type service requested: LTL - less-than-truckload or TL - Truckload (Over the road) |
| Equipment | Any specific equipment requests, such as van, flatbed, special length, etc. |
| Trailer Number | The alpha-numeric identifier code for the equipment that transported the shipment |
| Total Stops Including Final | The number of stops to be made after the initial origin pick up. If the only stop to be made is the final delivery, the total will be shown as 1. |
| Actual Ship Date and Actual Delivery Date | The date and time for events associated with this load. |
| Commodity, Pieces, Weight, and Cube | The description of the merchandise being shipped, along with the total pieces, weight and volume (Cubic Feet) for the merchandise. This is a combination of all the shipments on the load. |
| Load Comment | Any remarks associated with this load. |
| Origin | The Name and Address of the location where the first pickup will be made. Clicking on the underscored title "Origin" displays the "Logistics Stop Details" page for the origin stop. |
| Contact | The name, telephone number and fax number of the party at the origin point who can provide information to the carrier. |
| Appointment From / Appointment To | The beginning time and ending time of an appointment window that was already set at the time of order entry for the stop displayed above. |
| Stop Memo | Any remarks that are related to this stop. |
| Stop # |
The name and location where this stop will be picked up or delivered. It is numbered, starting with 1 for the first stop after the initial pick up. If a shipment is moving from one shipper to one consignee, the delivery stop will be shown as Stop 1. The numbering shows the order in which the stops are to be made.
Clicking on the underscored text for "Stop #" will display the Logistics Stop Details screen for the selected stop. |
| Contact | The name, telephone number and fax number of the party at the stop who can provide information to the carrier. |
| Appointment From / Appointment To | The beginning time and ending time of an appointment window that was already set at the time of order entry for the stop displayed above. |
| Stop Memo | Any remarks that are related to this stop. |
| Stop # | The stop information and contact is repeated as many times as necessary for the shipment. Again the user can click on the Stop # to display the Logistics Stop Detail screen for the selected stop. |
When any events have been reported for the load, they will appear here in the following format.
| Event Date | The calendar date on which the event was reported to have occurred. The format of the date is MM/DD/CCYY. |
| Event Time | The time, shown on the basis of a 24 hour clock, when the event was reported to have occurred. |
| Event | The code and description of the event that is being reported on this summary page. These include such items as tendering, accepting or rejecting a load by a carrier, and release for shipping. |
Clicking the "Go Back" button found on the bottom of this page will return the user to the Logistics Summary Page, where other shipments or loads can be chosen for detailed display.
| Stop Identifier | A description of the displayed stop. |
| TM Load # | The Load Number assigned to this stop. |
| Stop Type | Indicates the type service to be performed at this stop. Valid types are *PICK* (pick up) and *DROP* (delivery). |
| Appointment From / To | The beginning time and ending time of an appointment window for this stop. |
| From | The name and address for the stop. |
| Contact | The Name, Phone and Fax number for the individual at the "From" stop who may be contacted in regards to this stop. |
| Stop Memo | Any remarks that were included for this stop at time of order creation. |
| TM Shipment # | The reference number assigned to this shipment in our TM system. Clicking on this text will display the "Logistics Shipment Details" screen for this stop. Since a load can contain multiple shipments, more than one TM Shipment # can be listed for a Load Stop. |
| PO Number | Purchase Order Number. |
| Order Number | The order number associated with this stop. |
| Work Order Number | A customer reference number. |
| Weight and Cube | The total weight and volume of the merchandise at this stop. |
| Pieces | The total number pieces to be handled at this stop. |
| Memo | Any information entered for the shipment at this stop. |
When any events have been reported for the stop, they will appear here in the following format.
| Event Date | The calendar date on which the event was reported to have occurred. The format of the date is MM/DD/CCYY. |
| Event Time | The time, shown on the basis of a 24 hour clock, when the event was reported to have occurred. |
| Event | The code and description of the event that is being reported on this summary page. These include such items as tendering, accepting or rejecting a load by a carrier, and release for shipping. |
The following table displays the carriers who are currently set up for tracking and/or document retrieval with our company and our customers. In addition to the carrier name, the various Unyson Logistics SCAC code that are used for this carrier are shown.
| Carrier Name | Primary and Alternate SCACs | Tracking Available? | Document Retrieval Available? |
| A. Duie Pyle Companies | LTLPYLE | Yes | Yes - Link opens the Tracking Screen where user can continue to bring up documents once tracking is complete. |
| Averitt | LTLAVRT | Yes | No |
| Brandt Truck Line | LTLBRIL | Yes | No |
| Central Transport | CTLCTII | Yes | Yes |
| Colonial Freight | IRCFWH | This tracking site is under construction and will be available soon. Presently it cannot be used. | No |
| Con-Way Freight |
LTLCWCE LTLCWSE LTLCWWE |
Yes | No |
| Estes |
ESTE LTLESTE |
Yes | No |
| FedEx Freight |
ARFW1 LTLFXFE |
Yes | No |
| Gemini Traffic Sales Inc. | LTLGEMI LTLGTFF | Yes. Note. If pro number ends with a letter, key the number without the letter into the Pro Number box to search for Gemini's tracking record. | No |
| Lakeville Motor Express | LTLLKVL | Yes | No |
| Milan Express Company Inc. | LTLMLXP | Yes | Yes - Link opens the Tracking Screen where user can continue to bring up documents once tracking is complete. |
| National Retail Systems, Inc. for Linens 'N' Things Import | LNTNARTI | Yes | No |
| Nebraska Transport Co. Inc. | LTLNEBT | Yes. User must key in pro number once the tracking page is accessed. | No |
| New England Motor Freight | LTLNEMF | Yes | Yes |
| New Penn Motor Express | LTLNEWP | Yes | Yes |
| Oak Harbor Freight Line | LTLOAKH | Yes | No |
| Old Dominion Freight Line | LTLODFL | Yes | No |
| Pilot Air Freight |
LTLPAAF LTLPALT |
Yes | Yes |
| Pitt Ohio Express | LTLPITD | Yes | No |
| PJAX Inc. | LTLPJAX | Yes | No |
| Roadrunner Dawes Freight System | LTLRDFS | Yes | No |
| Roadway Express |
RDWY RDWY1 RDWY2 RDWY3 RDWY-PST CFRDWY LTLRDWY |
Yes | Yes |
| Saia | LTLSAIA | Yes | No |
| UPS Freight | LTLUPGF | Yes | No |
| USF Companies |
DUGN HMES HMES-PST HMES1 LTLHMES LTLRETL LTLUSFH RESL RESL1 RETL RETL1 RETL2 RETL3 USF USFB USFD USFD1 USFH USFH1 USFHO USFHOL USFRED USFREDPS USFWORLD |
Yes | No |
| Vitran Express |
LTLVITR CFVITR |
Yes. User must key in pro number once the tracking page is accessed. | No |
| Weber Dist Services | LTLWDWI | Yes. User must key in pro number once the tracking page is accessed. | No |
| Wilson Trucking Company |
WILS1 CFWILS |
Yes | No |
| Yellow Freight System |
LTLYFSY |
Yes | No |
For the Unyson Logistics user, the following guidelines are used to determine what information is displayed in the Logistics Tracking Summary pages. (Carrier info is defined as the Carrier SCAC code, Carrier Name, Carrier ID, Carrier Pro Number, Carrier Contact and Carrier Phone Number)
The user can also retrieve an address from the Address Book by clicking on the Addresses button and keying specific information into search fields: Location, Business Name, Street Address, City, State, Zip Code, and Contact. These address entries can also be created prior to the order entry or during entry.
If the user wishes to include multiple stops en route, selection of an existing route that includes these stops will automatically populate the stop-offs. If there is no matching route, use the Address Book and click on the Add Stop button for an address to populate the additional stop fields. Whether pick up or delivery type stop is determined during entry of load details.
After completing this step, click the Next Step button to move to step 2.
| Commodity | A description of the merchandise being transported. | |
| Trailer Number | (only required for spotted trailers) | |
| Mode |
The method of shipping. Valid values are:
|
|
| All Available Equipment | No specific equipment is requested | |
| Equipment | Container or Trailer | |
| Size | 20, 40, 45, 48 or 53 foot | |
| Click here for equipment size and capacity specifications | Clicking on this text link will display a popup window that contains a table of equipment by size, with capacity and specifications for that equipment length. | |
| Spotted Trailer Loaded - Indicate 'Yes' or 'No" | Selecting 'Yes' will populate the Pick-up Date with the current date. | |
| Origin Stop 1 | The location for the first pick up stop, as entered in Step 1. | Pieces | A box to enter the actual number pieces being shipped followed by a pull down menu where the user can select a description of the type packaging. Valid types are:
| Gross Weight | A field where the user must key the weight, in pounds, for the total order being picked up at the First Origin Stop. | |
| Hazmat / Non-Hazmat buttons |
The customer must select one of these buttons to designate whether or not the order being shipped contains any hazardous material.
Selecting the Non-Hazmat button will allow the user to select one of the three buttons at the bottom of the screen: Previous Page (to return to the First Step), Finish Later (to place the order in Pending Status to be completed later), or Next Step (to proceed with completing the order). Selecting the Hazmat button will display a Hazmat Pop-up Window. Here the user must read the company's policy regarding the movement of Hazardous Materials, and review a list of commodities that we do not handle. Checking the disclaimer box and clicking the I Agree button will allow the user to proceed with the order entry. This pop-up window also allows the user to print the agreement or to cancel the window without accepting the terms. If this is done, the Hazmat selection buttons will be cleared and the user must make a new selection. Commodities that are restricted and not handled by the company are:
|
Note: If there is more than one pick up stop, each location can be populated with Pickup/Delivery/Pieces/Weight. The first stop's (Origin) piece and weight should be entered in the fields provided for Origin Stop 1. All additional pieces and weights will be entered along with each stop's detail, including the designation of whether each additional stop is a pick up or a delivery, on a screen that will be displayed when the first stop is completed. Important: For easier understanding of stop sequence, stop numbering has been modified. The initial pick up stop is now identified as Origin Stop 1. The first stop after initial pick up is En route Stop 2, and En route Stop 3 will be the second stop after initial pick up. The final stop will be designated as Destination Final Stop.
The system adds the origin weight plus all pick up weights to determine the total weight for an order. An error message stating that weight exceeds weight of marked equipment is based on the weights shown in the origin stop plus all other pick up stops. The user no longer has to enter the gross weight and pieces.
After all required information is entered, click Next Step button to continue to the next step.
The system determines the available prices based on the lane, load and equipment parameters specified by the user in the previous step. The following rules apply:
The system displays a list of all available pricing options for the specified load itinerary. The following rules apply.
Non Pricing Users will skip the above 'Select Price Option' process and continue onto 'Step 3 -- Enter Detail Information and Schedule the Load'. A non-pricing use is one who has chosen to bypass the price selection step in the order creation process. By doing so, the user has entrusted us to make price selections on their behalf in cases where multiple price options are available for the specified load itinerary.
Customer Advantage system determines Price for a Non-Pricing user, based on the lane, load and equipment parameters specified by the actor. The following rules apply.
Fuel Surcharge -- The rates shown on the web pages do not include any applicable fuel surcharges that may be assessed by the underlying carrier. We will pass these charges to the customer. As the shipper, you agree you will be responsible for any such fuel surcharges when you place an order on the Internet.
| Origin Stop | The location of the First Stop. This will populate automatically from the Address Book | Origin--Contact Name & Phone Number | These fields are required. They will populate automatically from the Address Book, but may be edited, if desired. |
| Destination Stop | The location of the final delivery. |
| Destination--Contact Name & Phone Number | (Required) These will populate automatically from the Address Book, but may be edited, if desired. |
| Origin--Fax and E-mail | (Optional) |
| Destination--Fax and E-mail | (Optional) |
| Handling Requirements |
Driver Assist, Lumper, Driver Load and Count, Driver Assist and Count, and Driver Count
(Optional) Standard accessorial services that may be required, and are displayed on the price charge. These may be selected for either the origin or destination stops. If the customer has a specific accessorial agreement with us, the order confirmation e-mail will display the following: |
| Pick-up Appointment | (Required) MUST be 24 hours from current day and only out 7 days. Both Earliest Date and Time are required. Spotted trailers must use current date. Use pull down arrows to select month, date and year for the date fields. |
| Latest Date & Time | (Optional) |
| Delivery Appointment ETA | The ETA Date and Time will automatically populate once the user enters the Pick-up Date and Time. ETA is calculated utilizing the transit time designated for that particular Price. |
| Additional Information | |
| BOL | Number assigned to the bill of lading by the shipper. Either this number or the Shipper Order Number is required. |
| Vessel # | (Optional) Number of the Vessel transporting the shipment. |
| Bond # | (Optional) For shipments moving in bond, the number associated with the order. |
| Shipper Order # | Shipper's order number as keyed by the shipper. Either this number or a Bill of Lading number is required. |
| PO #s | (Optional) Purchase Order Numbers. There are multiple fields provided for the entry of up to ten purchase order numbers. |
| Shipment Notes | (Optional) This will be populated with any comments made in the Address comment field, or may be keyed manually by the user at this point. |
| Route Notes | (Optional) This will be populated with any comments made in the Route comment field, or may be keyed manually by the user at this point. Any route notes keyed in this area will display on the completed order page, but will not update the route comments that were saved on the route page. |
After entering all the above information, you may either continue to the Next Step or choose to Finish Later. The Finish Later option allows you to save the entry as a Pending Order to be completed at a later time. If there are multiple stops on the order, selecting the Next Step option displays a screen that requests information for the additional stops. The fields are the same as those for the First and Final stops. The user again has the same options available on the original Step 3 screen. He may select Previous Step, Finish Later or Next Step
Once details for all the stops are entered, proceeding with the Next Step option provides the user with an Order Confirmation page. The user is encouraged to verify all information for accuracy before taking either step.
Please Note: The transportation cost does not include any applicable fuel surcharges that may be assessed by the underlying carrier. We will pass these charges through to you. As shipper you agree you will be responsible for any such fuel surcharges.
Please confirm now by reading the legal agreement and pressing the Book Shipment button at the bottom of the page.
Instructions for changes or cancellation of an order are included in this confirmation message (in red text). This message reads:
Repeating orders will require the user to enter new information for pieces, weight, verify non-hazardous, pricing selection, and the Bill of Lading number.
Access Pending Orders from the top navigation tabs. CA will display a summary listing of all pending orders for the customer. The following fields will be displayed:
| Resume | Permits the user to resume the order form for completion or to add additional information to the order and resave as pending. Press the Pencil/Paper icon to being. |
| Delete | Delete a pending order by clicking the trash can icon. A confirming screen will be displayed before completing the deletion. |
| Origin and Destination Addresses | Location of Origin and Destination |
| BOL# | The Bill of Lading Number keyed into the order at time of order entry. |
| Pick-up Date | If pickup date was entered by the user at time of order entry, it will be displayed here |
| Expire Date | Expiration date of pending order -- 60 days from last saved date. |
| Location Name | (Required) Unique identifier for the Customer |
| Business Name | (Required) |
| Street Address | (Required) |
| City, State, Zip Code | (Required) |
| Contact Name | (Required) |
| Contact Phone Number | (Required) |
| Contact Fax Number | (Optional) |
| Contact E-Mail | (Optional) |
| Comments | (Optional) These will appear in Step 3 of the Order Entry Process |
| Business Hours | (Optional) |
After all desired information is entered, click the Add button to save the address.
| Route ID | Must be a unique ID name, up to 48 alphanumeric characters. This is selected by the user. |
| Commodity | Use the pull down arrow to display options and select the one that matches the commodity being shipped on the route. This sets a default that can be Changed for future orders. |
| Pieces | Key the pieces and then use the pull down arrow to display options and select the type units being shipped on this route. This sets a default that can be Changed for future orders. |
| Mode |
Click the button to select the transportation mode. Values are
|
| All Equipment | Click the button to indicate that any type equipment is valid for the route. |
| Equipment Type | If ALL Equipment is not selected, click the button to indicate if a Trailer or Container is required for the move. |
| Equipment Size | Click the button(s) to indicate the size equipment that is valid for the move. |
| Origin and Destination Addresses | Obtained from the Address Book. If desired address is not located in the Address Book, one can be created during this process. |
| Stop | Obtained from the Address Book. If desired address is not located in the Address Book, one can be created during this process. |
| Comments | A free form box where the user can enter remarks that will always be displayed when this route is selected in the future. This is information that would apply to all orders that will move along this route. It will be displayed in the "Place Order" process on the screen in Step 3. |
| Add additional e-mail addresses | A free form box where the user can now enter additional e-mail addresses that will be displayed when this route is selected in the future. The user should not enter his or her personal e-mail, as that is automatic. If the user wishes, more than one additional e-mail address can be keyed by leaving a space or placing a comma between e-mail addresses. Additional e-mail addresses will be displayed in the "Place Order" process on the screen in Step 4-Verify Order Details and Book the Order. These e-mails can be added to, removed, or updated in Step 4, as desired on any individual order. |
After all required information is entered for the desired route, click on the Save Route button.
| Origin City | You may enter as many or few letters in this field as desired, or leave blank to display all cities in a given state. |
| Origin State | Minimum requirement to search for shipments originating from one state. |
| Destination City | You may enter as many or few letters in this field as desired, or leave blank to display all cities in a given state. |
| Destination State | Minimum requirement to search for shipments destined to one state. |
| Mode |
Method of transportation. Valid entries are:
|
| Equipment Type |
Required shipping box. Valid choices are:
|
| Equipment Size | 20, 40, 45, 48, 53 or all |
Submit -- Pressing the Submit button processes the request for the table of rates that apply. If you wish to view all pricing tables, leave all fields blank and press Submit.
This will display the tariff-pricing table, containing all resulting contract and route specific pricing for a customer, including any market prices the customer has previously used for a shipment. Items shown in the display tables are:
| Price Type |
Active - Price selected in a previous order that is only effective for 30 days
|
| Origin | City, State and Zip of first pick up location |
| Destination | City, State and Zip of last delivery location |
| Stops | The number stops in addition to the Origin Pick Up and Final Destination Delivery are included in the price |
| Rail Route | When a price is Route Specific, a magnifying glass is shown in this column. Clicking the glass will display the details of the rail route. |
| Commodity | General description of commodities covered by price |
| Equipment | Specific equipment covered by price |
| Mode | Transportation method covered by price - Intermodal (IM) or Over-the-Road (OTR) |
| Estimated Transit Time | Estimated length of travel time for the movement |
| Expiration Date | Date shown for the price to expire |
| Price/Load | Price per Load - The total charge (excluding any fuel surcharges) for moving the load. |
| Price/Mile | Price per Mile - The charge per mile (based on calculations from Rand McNally MileMaker. |
| Select | Clicking on the 'check mark' in this field takes the user to the order entry process. |
| Detail | Clicking the magnifying glass in this column allows the user to view details of the price, including any stops in addition to the first origin and last destination. |
If the user selects to view all his rates, leaving all the fields blank and pressing the Submit button will display a listing of all rates.
On the View Tariff page, a currency conversion tool is available for users. By clicking on the text "Click here to use XE.com's Universal Currency Converter", the user will be taken to the XE.com web page where he can enter an amount and then designate in which currency this amount is entered. Then the user can select the currency for conversion. Clicking the "Click Here to Perform Currency Conversion" button will display the results, including the date of the rates used for the conversion. This converter is valid for all world currencies.
At the bottom of the View Tariff table are three buttons that will perform functions as detailed below.
| Back to Search Button | Takes the user back to the original 'View Tariff' screen, where one can select new search criteria. |
| Download Button |
Clicking the Download button will provide an Excel formatted report of all shipments included in your search selection. After clicking this button, you may be required to re-enter your user password. Follow the instructions in the dialogue box and standby while the download completes. This may take a little time. You will be prompted to save this file to disk or to open it at its current location.
Once the file has downloaded, click the Open button to automatically display the detailed information of each individual load in an Excel spreadsheet format. The user may now use the Excel properties to sort and manipulate the data as desired. Note that the spreadsheet you download will have a new column next to the Status Column, "TM Load Status". This column will contain the status that is shown in the Unyson Logistics' TM application and the status that used to be shown on the Logistics tracking screen. The Column Headings on the spreadsheet are as follows:
|
| Print Button | Clicking the Print button will display a print friendly formatted screen and the print menu from your browser. Check your destination printer and click OK to print a copy of the Customer Tariff. |
Order Entry Defaults
The Order Entry Default area is displayed in one of two ways. The user with privileges to only one customer simply clicks on the Change User Defaults button to access the area. The user with privileges to multiple customers and order entry privilege completes any desired changes to tracking/reporting settings and clicks the Submit button to display this area. From this area, the user can select settings that will populate certain fields of an order when the order entry process is initiated. Defaults that can be set include mode, equipment type, origin and/or destination, location, commodity, and type pieces. It is here that one designates the profile of 'Pricing' or 'Non-Pricing' system user. Another choice is to select the box marked "Set last used order values as "default". When this choice is made, all other values in this area are disabled and ignored. This means that any time a user creates an order and manually changes settings in that order, the next order that is displayed will contain the settings made for the last order.
NOTE: These default settings are not binding as the user has the ability to override any defaults during creation of an individual order.
The TM system (logistics) used for handling ltl shipments contains orders that have to be matched to carrier invoices. This has previously been an all manual process where the users had to take the information from the carriers for these shipments and search their shipments to determine which of our records matches the carrier's invoice and movement information. The LTL Matching application allows internal company users the ability to select a list of EDI carrier shipments (inbound or outbound and not associated to any TM shipments) and to link these to one or more LTL TM shipments. The system will perform searches to locate records that match exactly to the reference numbers. If an exact match is not found, the system will then search for a "like" match and then on a state to state match. The user will then only need to view those records that could be applicable in their matching process. These LTL TM shipments are non-consolidated and not tendered. A summary Carrier match-pay record will be created as part of the matching process, but the associated charge detail will not be created. A report containing the carrier invoice detail will be created for the user to manually enter these charges into TM, if appropriate.
The LTL matching process starts with the electronic collection of data from enrolled LTL carriers. This data populates the database that will be used by the Matching application. The system runs a background process to monitor all unmatched carrier data to see if there is a load or shipment in TM with the same Carrier ID and Pro #. If the system finds such a match, it will update the carrier data to reflect a match without manual intervention. These records will be available for the internal users to view, but not select in the LTL Matching application. Availability of the LTL Matching application will be based on a customer basis.
The screen that is displayed when the user selects the "LTL Matching" navigation tab contains the standard CA search form with the following fields available for search:
Search Form |
|
| Field Name | Description |
| Origin City | A text field where the user can key the name of the city where the carrier shipments originated. |
| Origin State | A drop down box where the pickup state can be selected. Only the 50 United States and the District of Columbia are available. |
| Origin Zip Code | A numeric field where the user can key a 5 digit zip code for the origin of the carrier's shipments. |
| Destination City | A text field where the user can key the name of the city where the carrier shipments delivered. |
| Destination State | A drop down box where the delivery state can be selected. Only the 50 United States and the District of Columbia are available. |
| Destination Zip Code | A numeric field where the user can key a 5 digit zip code for the destination of the carrier's shipments. |
| Carrier ID | A drop down menu where enrolled carrier identification codes can be selected. |
| Carrier Name | A text field where the user can key the name of an enrolled carrier |
| Actual Ship Date - From and To | Two boxes where the user can enter either a shipment date to initiate the search or a shipment date to terminate the search, or both. If the user keys only a From date, all records will include shipments made on the selected date through the present. If the user keys only a To date, the search will result in all shipments made up to and including the selected date. |
| Search button | Clicking the search button will initiate a search through the database for all records which match the selected criteria. If none is found, a message will be displayed "No carrier shipments match your search criteria. Please modify your search criteria." |
| Clear button | Clicking the clear button will reset all search boxes to "blank". |
Once a search has been completed, the Carrier Shipment Summary page is displayed for the user. This will display up to 100 matching records in a box on the center of the screen. About 9 records are visible, but the rest can be viewed by scrolling down. The following fields are available in the Carrier Shipment Summary.
Carrier Shipment Summary |
|
| Field Name | Description |
| Selection box | A check box that is selected by the user clicking in this box with the mouse. Selecting one or more records activates the "Find TM Shipment Match" button. |
| Origin | The name and origin city/state/zip of the shipper. |
| Destination | The name and origin/city/state/zip of the consignee. |
| Actual Ship Date | The date on which the shipment was picked up. |
| Carrier Pro # | The number used by the carrier to identify the shipment in his system. |
| Carrier Id | A seven character code assigned to ltl carriers who are enrolled in this application. They send their data via EDI and have completed the required onboarding process. |
| Weight | The poundage of the ltl shipment in the record. |
| "Select All" Button | Clicking this button will place a check mark in the box preceding every record that is displayed in the summary detail. This will also activate the "Find TM Shipment Match button. |
| "Find TM Shipment Match" Button | This button becomes available after one or more shipments is selected by the user. Clicking this button will perform a search and display the "Process Shipment Match" page, starting with the first record selected, and then allowing the user to continue one record at a time until all are reviewed. |
The Process Shipment Match page that is displayed after the user clicks the "Find TM Shipment Match" button contains two areas. The first is the ltl shipment record received from the carrier. The lower area of the Recommended Matching TM Shipments table. Based on the carrier shipment, CA displays a list of previously matched and recommended TM shipments belonging to the same customer. The previously matched shipments will be displayed first followed by the recommended TM shipments. Previously matched shipments are shipments not associated to any TM load but they have carrier pro number and LTL carrier id (i.e. "LTL" + carrier SCAC code). In order for a TM shipment to have a carrier pro number, it should be matched to a carrier shipment with the same carrier pro number. Recommended TM shipments can be either "exact" reference number match or "like" reference number match. Exact reference number match is one or more reference numbers in the carrier shipment, regardless of the type, match exactly one or more reference numbers in the TM shipment. Like reference number match is one or more reference numbers in the carrier shipment, regardless of the type, contains in one or more reference numbers in the TM shipment. These three types of shipments will be listed in a different color background. Exact reference number match shipments will be listed before like reference number match shipments. If there is more than one TM shipment for each type, they will be sorted by requested pickup date and shipment number. The 'like reference number' search will search for shipments where the first 5 digits of the reference number are a match.
If the user cannot find the desired shipment in the list, he/she can click on the "Show All" button to display more TM shipments belonging to the same customer with the exact match on origin and destination states. If more than one TM shipment is found, they will be sorted by requested pickup date and shipment number.
With the ability to include multiple legs in the LTL matching process, a couple of edits have been added. For the consolidation (multiple TM shipment match), if any of the leg number is not "1", an error message "Cannot consolidate, due to one of the Shipments has multiple legs" will be displayed. For the "Find & Match " function, if the number of the shipment returned is greater than "1", an error message "Find & Match function does not allow for shipment with multiple legs" will be displayed.
Process Shipment Match |
|
| Field Name | Description |
| Detail icon | A magnifying glass that can be clicked to display the Carrier Shipment Details page for that record. This record contains the same information as shown in the summary table, but also shows the trailer number, the delivery date, the warehouse, and any events that have been received for this shipment. |
| Delete icon | A trash can icon that be used to remove a carrier shipment from web viewing and selection. This is only available to users with "manager" privilege. |
| Links | When a carrier provides external links to their web site to retrieve documents and tracking information, using the carrier pro number, hyperlinks) will display in this column. The user can click on the link to access the information. CA opens a popup window to display the document page from the carrier's web site. |
| Origin | The Name, City, State and Zip Code of the shipper. |
| Destination | Name, City, State and Zip Code of the consignee. |
| References | Primary and Secondary Reference numbers included in the record received from the carrier. There may be more than one reference number per reference type. To view other reference types, the user must display the Carrier Shipment Details page. |
| Carrier Pro # | The number used by the carrier to identify the shipment in his system. |
| Ship Date | The date on which the carrier picked up the shipment. |
| Carrier ID | The alpha code that identifies the carrier in the TM system. |
| Weight | The poundage of the ltl shipment. |
| Skip button | Clicking on the "Skip" button will move the user to the next record that has been selected without attempting to make a match to the record. |
| Quit button | Clicking on the "Quit" button will return the user to the carrier shipment selection screen to select a new list of carrier shipments. |
The Recommended Matching TM Shipments display that is shown on the lower portion of the screen contains the following fields.
Recommended Matching TM Shipments |
|
| Field Name | Description |
| Check Box | Clicking this box will activate the Match button for this record and allow the user to match the selected TM record to the carrier record shown at the top of the screen. |
| Detail icon | Clicking the magnifying glass icon will display the TM Shipment Details screen that contains all the reference numbers associated with the order. In addition, the commodity, pieces and weight and cube, as well as appointment information are displayed. |
| Origin | The Name, City, State and Zip Code of the shipper. |
| Destination | The Name, City, State and Zip Code of the consignee. |
| References | Primary and Secondary Reference numbers included in the record received from the carrier. There may be more than one reference number per reference type. |
| Shipment # | The TM system 6-digit identification number that is assigned to each shipment. |
| Leg # | The sequence number that is assigned to the leg of the shipment displayed in that record. |
| Customer Id | The TM system 12 digit customer ID number. More than one customer ID can be associated with a customer, based on rates. This information is critical so the user knows that only like IDs should be matched. |
| Req. Pickup Date | Requested Pickup Date - The date on which the customer requested the shipment be picked up. |
| Req. Deliv | Requested Delivery Date - The date on which the customer requested the shipment be delivered. |
| Show All button | If the system does not find a match based on reference numbers--exact or like--the user can click this button to display all shipments which originate and terminate in the same states as the carrier's record. The user can then determine if a match exists. |
| Create TM Shipment button | If the user determines that a match does not exist in the TM system, clicking on the Create TM Shipment button will display the "Create TM Shipment" popup window that contains the Carrier ID, Carrier Pro #, a drop down box where the user will select the proper Customer ID for the record. Clicking OK after selecting the Customer ID will create a shipment in TM. The user must record the Carrier pro number to locate the new shipment record in TM. |
| Match button |
Clicking on the Match button after selecting the TM shipments to match to the Carrier Record will display the Matching TM Shipments popup window containing the Carrier ID, Carrier Pro #, and Shipment Number. There are two buttons available in the box--"OK" to complete the match and "Cancel" to abort the match. If the user selects OK, the "Process Shipment Match" screen will display the next record, if any. If there are no more records, the user will be returned to the carrier shipment search selection screen.
The following notes should be remembered about the matching process.
|
| TM Shipment #: | A text box where the user can key a specific TM shipment number to initiate a search. |
| Find & Match | After keying a shipment number into the text box, clicking this button will return the Matching TM Shipments popup window will be displayed with the search results. If the Shipment is found, the window will display the details of the shipment and allow the user to select "Match" or "Cancel" in the window. |
| Color Key Box |
A key box is displayed in the lower section of the screen and shows the meaning of the various colors used in the Recommended Matching TM Shipments table.
|
The Reporting tools work only with the Microsoft Internet Explorer browser. They will not work with any Netscape browser.
Selecting the 'Reporting' Navigation Tab displays the Customer Advantage Web Reporting page where the system displays three types of reports.
The system allows the user to perform the following actions:
The navigation buttons shown on the Screen are described in the following table
| Create Reports | Clicking this button initiates the process of designing a custom report that can be viewed on the screen, downloaded for printing, or saved for future use. |
| My Reports | Clicking this button displays a listing of any custom reports saved by the user. |
| Company Reports | clicking this button will display a listing of all 'My Reports' created by users within a company. These reports can be copied and the copy modified by all users in the company, but the original can only be changed or deleted by the author. |
| Standard Reports | Displays a listing of commonly requested reports. More details are found later in this document. |
| Graph | Clicking this button allows the user to display a pie chart, a line graph or a bar graph of data selected from the summary reporting fields of Load Count, Average Transit Days, Average Billed Amount, Late Loads, On Time Loads, and Percent on Time. |
| Save | This button will allow you to save your report or create a new report from the existing report |
| Download/Print | This button will allow you to download your report to your local PC. The report will launch automatically in Microsoft Excel or display in your browser if you do not have Excel. You can then save the report to any file location that you wish using the File/SaveAs function on your toolbar. You can print the report from any application that you save it in. Please format your report using File/Page Setup on your toolbar before you print it. |
| Schedule Delivery | This button will allow you to schedule delivery of this report via e-mail or fax. Delivery can be to yourself and other people on a consistent schedule. This is a very convenient feature if you wish to see the report you have created on a regular basis, but do not wish to return to this application and run it manually every time. |
| Modify | This button will return you to the Report Field selection screen and allow you to change your report. |
General Fields: The value displayed in a general field corresponds to the field value for a single row of the report. For example, if the report filter specifies Illinois as the Origin State, and Georgia as the Destination State, then the report will display all loads from Illinois to Georgia, one per row.
Summary Fields: These fields display summary values from multiple matched rows. If a report contains one or more summary fields, then each row of the report will contain a unique set of general field values (i.e., each row will represent a group of matched records). For example, consider a report defined with the fields Origin State, Destination State and #Loads. If the report matches 100 loads between Illinois and Georgia, the report will only display a single row for this combination. Note: if the report did not contain any summary field (#Loads in this case), then the report would display 100 rows.
| Report Name | Fields | Filters | Default Sort/Ascending | Default Filter |
|---|---|---|---|---|
| Cost Detail Report |
BOL#,
Trailer#, Mode, Origin City, Origin State, Destination City, Destination State, Ship Date, Weight, Pieces, Billed Amount |
Ship Date Range,
Mode, Origin City, Origin State, Destination City, Destination State |
Primary: Origin State,
Secondary: Origin City |
None |
| In-Transit Report |
BOL#,
Trailer#, Mode, Origin City, Origin State, Destination City, Destination State, Ship Date, Last Reported Location, Last Reported Date, Last Reported Time, EBT Status, ETA Date |
Mode,
Origin City, Origin State, Destination City, Destination State, Ship Date Range, EBT Status, ETA Date Range |
Primary: Origin State,
Secondary: Origin City |
EBT Status = Intransit |
| Shipping Detail Report |
BOL#,
Trailer#, Mode, Origin City, Origin State, Destination City, Destination State, Ship Date, Delivery Date |
Ship Date Range,
Delivery Date Range, Mode, Origin,City, Origin State, Destination City, Destination State |
Primary: Origin State,
Secondary: Origin City |
None |
| Service Detail Report |
BOL#,
PO#, Shipper Order #, Trailer#, Mode, Origin City, Origin State, Destination City, Destination State, Ship Date, Ship Time, In Gate Date, In Gate Time, Notify Date, Notify Time, Out Gate Date, Out Gate Time, Delivery Date, Delivery Time, Transit Standard, Actual Transit, On Time/Late |
Ship Date Range,
Delivery Date Range, Mode, Origin,City, Origin State, Destination City, Destination State |
Primary: Origin State,
Secondary: Origin City |
None |
| Drop Trailer Status Report |
BOL#,
Trailer#, Mode, Origin City, Origin Sate, Destination City, Destination State, Ship Date, Last Reported Location, Last Reported Date, Reported Time, EBT Status, ETA Date, Delivery Appt Date, Drop Date, Empty Return Date |
Origin City,
Origin State, Destination City, Destination State, Ship Date Range, EBT Status, Delivery Appt Date, Drop Date, Empty Return Date |
Primary: Origin State,
Secondary: Origin City |
None |
| Transit/Cost Summary Report |
Origin City,
Origin State, Destination City, Destination State, #Loads, Ave Transit Time, Ave Amount Billed |
Ship Date Range,
Mode, Origin City, Origin State, Destination City, Destination State |
Primary: Origin State,
Secondary: Origin City |
None |
| On-Time Summary Report |
Origin City,
Origin State, Destination City, Destination State, Late Loads, On-Time Loads, % On-Time Loads |
Ship Date Range,
Mode, Origin City, Origin State, Destination City, Destination State |
Primary: Origin State,
Secondary: Origin City |
None |
| On-Time Trend Report |
Origin City,
Origin State, Destination City, Destination State, %on-Time: Week, Month, Quarter. |
Ship Date Range,
Mode, Origin City, Origin State, Destination City, Destination State |
Primary: Origin State,
Secondary: Origin City |
None |
The Customer Administrator(s) at each customer can create and delete their users, as required. The Customer Administrator is noted in the user listing with an underscore and italicized print. The number of Customer Administrators is limited.
Selecting the User tab from the Navigation Bar displays a list of existing Users, listed in alphabetical order by last name. Here the Customer Administrator could edit or delete an existing user. They may also select from two options to add new users. Create User is selected to create new Internal Users. Add Third Party User is selected to create a Third Party User.
| User ID | User names should be entered in lowercase with their first initial followed by their full last name and must be between 5 and 25 characters long. If an error message is displayed that indicates the ID is already in use then use the first two letters of the user's first name. If the user's entire first name is used and the system still indicates that the ID is in use then start adding numbers in ascending order to the end of the ID . For example, Al Smith could be "asmith", "alsmith" or "alsmith1". |
| First Name | Key in user's first name here. |
| Last Name | Key in user's last name here. |
| Phone Number | Key in user's 10 digit telephone number here |
| Phone Extension | (Optional) Key in user's extension number, if applicable. |
| Fax Number | (Optional) Key in the user's 10 digit Fax phone number here, if needed. |
| E-Mail Address | Key in user's e-mail address. |
| Time Zone | Use pull-down arrow to select time zone where user works. |
| Daylight Saving Time Observed | A check in the box denotes that DST is observed in the time zone where the user works. The default is 'Observed'. Click this box to clear it if DST is NOT observed in the user's area. |
| Role | Use the pull-down arrow to select either Administrator or User |
After completing the fields, press the Next button to move to the 'Set Up User Privileges Screen'. From the pull down menu, select the Customer for whom this user can trace or place orders and press the Next button. This will display the 'Set User Privileges screen, where the new user can be assigned Shipment Tracking and/or Order Entry privileges.
The 'Set Up User Privileges' screen is completed as follows.
| User ID | The assigned user identification for the selected party. (system populated based on selection from previous screen) |
| Customer Name | The Company Name for whom privileges are being granted to the user. (system populated based on selection from previous screen) |
| User Set up Instructions | Clicking this text link will display a popup window, "Set User Privileges, that gives the user information on setting up privileges. |
| Privileges | Clicking the box before 'Shipment Tracking' enables this user to track shipments for the company specified. |
|
Origins
(left column) |
Click either States or Zip Codes to set the extent of restriction on tracking privilege from an origin. |
| Add |
Click the 'add' text.
If 'States' was the Origin selection, a table of states in the US, Canada and Mexico will be displayed where the user can select as many of the options as desired. Then click the Finish button to add the states to the Origin Box. If 'Zip Codes' was the selection, a table will be displayed where the user can enter zip codes in the following formats. US Zip Codes must be either 5 or 10 digits with a '-' between the first 5 and last 4 digits. Canadian Zip Codes must be 6 characters long with no spaces, and Mexican Zip Codes must be 5 digits long. |
| Delete | Click the 'delete' text. This will delete any states or zips highlighted in the box. |
| Reset | Click the 'reset' text. This will clear all states or zips in the box and allow the user to make new selections (or leave blank to allow all). |
|
Destinations
(right column) |
Click either States or Zip Codes to set the extent of restriction on tracking privilege to a destination. |
| Add, Delete and Reset | Same as for Origin |
| Privileges | Clicking the box before 'Order Entry' enables this user to place orders for the company specified. |
|
Origins
(left column) |
Click either States or Zip Codes to set the extent of restriction on order entry privilege from an origin. |
| Add |
Click the 'add' text.
If 'States' was the Origin selection, a table of states in the US, Canada and Mexico will be displayed where the user can select as many of the options as desired. Then click the Finish button to add the states to the Origin Box. If 'Zip Codes' was the selection, a table will be displayed where the user can enter zip codes in the following formats. US Zip Codes must be either 5 or 10 digits with a '-' between the first 5 and last 4 digits. Canadian Zip Codes must be 6 characters long with no spaces, and Mexican Zip Codes must be 5 digits long. |
| Delete | Click the 'delete' text. This will delete any states or zips highlighted in the box. |
| Reset | Click the 'reset' text. This will clear all states or zips in the box and allow the user to make new selections (or leave blank to allow all). |
|
Destinations
(right column) |
Click either States or Zip Codes to set the extent of restriction on order entry privilege to a destination. |
| Add, Delete and Reset | Same as for Origin |
| Allow Pricing | Clicking the box before this item will enable the new user to use the Pricing feature of Order Entry. |
| Don't Allow Pricing | Clicking the box before this item will disallow the new user from using the Pricing feature of Order Entry. |
| Save | Clicking the Save button will process the request and submit the new User with the privileges granted. |
| Cancel | Clicking the Cancel button will cancel the user's request and the new Third Party User will not be added. |
Click on the Add Third Party User button to display the following fields that are completed to create a new Third Party User.
| First Name | Key Third Party User's First Name here. |
| Last Name | Key Third Party User's Last Name here. |
| Phone Number | Key Third Party User's 10 digit Telephone Number here. |
| Phone Extension | (Optional) Key Third Party User's telephone extension here, if applicable. |
| Fax Number | (Optional) Key Third Party User's Fax Number here, if desired. |
| E-Mail Address | Key Third Party User's E-Mail address here. |
| Time Zone | Use pull-down arrow to select time zone where user works. |
| Daylight Saving Time Observed | A check in the box denotes the DST is observed in the time zone where the user works. The default is 'Observed'. Click this box to clear it if DST is NOT observed in the user's area. |
| Role | Third Party - this field is populated by the system. |
Clicking the Next button displays the Set User Privileges screen. See the instructions for setting user privileges for a new user.
The Customer Administrator for the customer is urged to maintain the list of users to ensure the integrity and security of the customer's shipping information.
Customers
Third Party Users and Company Users will also have access to an additional Navigation Menu Bar option 'Customers'. Clicking on the Customer's Navigation Menu Tab displays a list of customers for whom the Third Party User is authorized to track shipments in Customer Advantage or a list of all Customers enrolled in Customer Advantage. This screen displays the following:
| Business Name | Keying a letter or series of letters into this box and pressing the Search Button will display as many customers as meet the search criteria. The system will trim spaces so that a search for A CUS would also return ACUS, if it exists. |
| Syscon Number | Keying the 5 digit system ID number for the customer into the box and pressing the Search Button will display the customer name that exactly matches the search criteria. Since syscon numbers are unique, only one customer will be returned. | Become | Clicking the check mark before the name of the company for which tracking is to be performed allows the Third Party User to be treated as a user for that company. The Third Party will be able to access all privileges as assigned by the company granting access. |
| Users | Clicking this icon will display the "View User" screen. |
| Business Name | The name of the company for whom the Third Party has been granted some form of privilege. |
| Syscon Number | The system assigned number for the listed company. |
| Selling Office | The identifying number for company office (or offices) that controls the company's account. It is possible that more than one office could control different lanes of traffic for the same customer. |
| Edit |
The Company Admin User will have an edit icon available for each customer. Clicking this displays the Customer Information screen where the basic information about the customer is maintained. Fields available in this screen are:
|
When the User clicks the 'Become Check' the 'Welcome' page will be displayed again with the Navigation Menu tabs that may be used by the Third Party User. The Customer Name will also be displayed in the upper right hand corner of the screen. Click the Track button to start tracing for the 'Customer' you have become.
The Intermodal Price Management tab is available for the authorized user who has the ability to request price quotes from Customer Advantage. Completing the form and submitting will generate a quote in our Pricing System. A Price Quote letter will be generated and e-mailed to the requestor. Conversely, if the quote is not competitive with other carriers, the user can complete a form to reject the quote and obtain personal intervention by a pricing analyst to determine our ability to match the competition.
When the user first clicks on the tab, the Price Search form is displayed. Here the user can search to see what prices already exist for their account. They can also use the search filters to limit the return of just those prices which fit the criteria entered. There are drop down boxes to assist in the search. If multiple prices are returned, the user can use the Select function (select one, two or more, select all, or select none to clear the selections) and then click the Price Information button. This will display information about the the first price record selected and create a queue of the other records selected. By clicking the "next" button the user can see the next record in the queue. If a price doesn't already exist, the user can select the "Create Quote" button to display the form for completion.
IML Price Mgmt
Completing the Price Quote Request Form |
|
| Field | Description |
| Mode | This defaults to Intermodal. Currently that is the only type price that can be requested through this application. |
| Customer Number | This defaults to the user's Customer number and cannot be changed. |
| Effective Date* | A required field that defaults to the current date. It can be keyed to a different date (today or future only) or a date can be selected, using the calendar icon by the box. This will be the first date when the quote will be applicable. |
| Expire Date | A field that defaults to 7 days after the Effective date. It cannot be changed and is the last date when the price quote will be applicable. |
| Respond By | An optional date field that can be keyed by the user or populate, using the calendar icon. This gives the pricing analyst an idea of when the price is required by the customer. |
| Lane Details | In this section of the form, the user selects or keys the following information. Asterisks indicate this is a required field. |
| Equipment Type* | A text box where the user highlights the length equipment desired. Multiple types can be selected by highlighting with the mouse. |
| Service Type |
A pull down menu where options include
|
| Volume and Frequency* |
This includes two required fields. The first calls for the number of expected times that this load will move. The second field is selected from a a drop down menu that lists the frequency of the move. Valid choices are:
|
| Transit Days | The average number days expected for movement of the freight in the lane being requested. This field is keyed. |
| Weight | The average weight of the merchandise that will be moving in the price being requested. |
| Service Level* | A drop down menu where the user can select the desired handling of the shipments. Standard level is the default and indicates the shipment should deliver in the average time for this lane. Premium level is expedited service and will be charged at a higher level to offset extra handling for faster movement. |
| Opportunity Type* |
A drop down menu where the user defines the projected expectations for use of this price quote. Choices are:
|
| Opportunity Start Date* |
A drop down menu where the anticipated date when the opportunity would be available where the choices are:
|
| Commodity Code* |
This field has a search icon (flashlight) that can be clicked to display a "Search Commodity" window where the user can find and select the desired commodity that is moving in this shipment. There are filters to limit the search. Keying a partial description in one of these fields will return a limited set of choices. For example, keying "FAK" in the SORT description field returns 6 commodity codes. Based on the complete descriptions, the user would then click the radio button in the Select field and press the Submit button. These search fields are:
|
| Hazmat check box | When the quote being requested covers hazardous materials, this box must be checked. Note that there is a fixed charge of $250 additional added to prices for Hazmat. |
| High Security | A check box that must be checked when the product being shipped for this price quote is high value and requires extra security precautions. This would include such items as electronics. |
| Origin |
This table contains information about the pickup stops. The user can complete just the one stop, or add additional rows if more than one stop is being picked up. Flashlight icons are provided to assist the user in searching for specific Name/Address records or City State combinations. Specific Name and Address records must be selected from the Name and Address Search Window that is displayed after clicking the icon. The City/State can be keyed or searched. It is a good idea to use the search in order to populate the county fields for cities that have more than one county in their boundaries. The fields in this table are:
|
| Destination | A table that matches the Origin stop, except all information applies to the delivery instead of pickup. |
| Beneficial Owner | These fields are only displayed when the price quote is being requested by a transportation company user. This requires the user to complete information about their customer for whom they will be using the price. These fields are the Customer Name, and the City and State where they are located. These must be keyed. |
| Competition |
This is a table where the user can enter information about any company competitors for the price being requested. Clicking the "Add competitor" button will display fields in the table that can be completed. The first field is a drop down menu with a list of many other carriers. Valid choices are:
|
| Special Handling |
Three check boxes the user can select to request special handling charges be included in the price quote. Valid choices are:
|
| Button | Description |
| Add Lane | Clicking the Add Lane button will return the Lane Summary page, with a review of the entered information. The user can review the information, and if complete and correct, then clicking the "Continue to get Quote" displays the final Price Quote Request page. Here the user's e-mail address and user id are displayed. Other parties to receive the Price letter can also be selected. Finally clicking the "Submit Quote" If changes need to be made, the user can select the "Back to Edit Lane Info" button instead. After submitting the quote, the Price Search form is redisplayed with the requested quote included in the summary results section. The Price number and Request number assigned to the quote are included here. |
This navigation tab is available for the customer who has been granted the privilege for this task. Clicking the tab will display the Unyson Logistics Viewer Application. There are six navigation tabs available for the Logistics Lookup. These are:
Clicking on the Individual Navigation link will display screens that give details of Loads in the selected Status. The display screens all act in the same manner and can be exported to an Excel spreadsheet. This screen is the usual "Viewer" model with 10 records displayed on the page and the ability to select to display "All" or to display the next 10 records, etc.The Status Summary page allows the user to select the desired customer from a drop down menu. (Selection will be limited to those customers who are linked as related customers in CA). Most customers will be limited to one customer. The page opens with a Search Form where the user can select a Begin Load Create Date, an End Load Create Date, and the Load Status (REJ, TEND, or ACC). All these fields are required. After making the selection, clicking on the Search Button will populate the Summary area below. This area contains 3 columns of data: Carrier ID, Carrier Name and Total Loads.
Selecting the Status Details navigation link Displays another Search Form with the same fields as those on the Status Summary page. Again all fields are required. This time, there are more fields in the summary table that is displayed. These fields are:
Selecting the Load Status Move by Movement Code navigation link displays a Search Form where the user selects the customer, the Movement Status, the Begin Load Create Date, the From and To Pickup Date and the From and Two Delivery Date. Once the selections are made, a Summary screen is displayed with 14 columns displayed. Movement statuses include:
Clicking the "Shipment Status by Movement Code" navigation link displays a Search Form that is identical to the "Load Status by Movement Code" search form. However, after completing the criteria and pressing Search, the Summary page will display results from the Shipment data instead of the Load data. The Status codes that are displayed are Shipment Statuses instead of Load Statuses. Otherwise the information is the same. The Most Common Shipment Status codes are:
Selecting the Load Status by Missing Movement Status Code will display a Search Form very similar to that displayed for the Load Status by Movement Code. This form has a field to select a Load Movement Status type and a creation date of less than a selected date, as well as a field to select a Load Movement Status that is missing. These choices are:
Selecting the Shipment Status by Missing Movement Status Code will display a Search Form very similar to that displayed for the Shipment Status by Movement Code. This form has a field to select a Shipment Movement Status type and a creation date of less than a selected date, as well as a field to select a Shipment Movement Status that is missing. The choices are identical to those for the Load Status by Missing Movement Code.
This navigation tab is available for the Company Manager user who has the ability to add and maintain Hub internal users. This was added to allow the Company Manager to search for any user by name. If the user is an internal company user, they can be maintained from this page. If the user is a customer user, the Manager can then select the Users link on the Customers page or the Third Party page and maintain the user there. A search form is displayed when the user clicks this navigation tab, allowing the manager to search by any of the following criteria:
There are two user types for the company's internal users. They are the Manager and the Customer Service Rep (CSR) user. Depending upon the user type selected, different navigation tabs will be displayed when the user logs in. The following table describes all the users, and the available navigation tabs for each. All users have access to the "Help/FAQ" pages link.Finally the tabs that are based on specific individual or customer privileges are not shown below. These include LTL Matching, IML Price MGMT (TPS Rate Quote), Reporting, 3rd Party, View Tariff.
| Hub Users | |||
| Role | User has not "Become" a Customer | User has "Become" a Customer who can order online | User has "Become" a Customer who cannot order online |
| Manager |
|
|
|
| CSR - Customer Service Representative |
|
|
|
| Customer Users | |||
| Role | User is not a registered Customer | User is a Customer who can order online | User is a Customer who cannot order online |
| CustAdmin | Not applicable |
|
|
| CustUser | Not applicable |
|
|
| Third Party User | Not applicable |
|
|
| Anonymous User | Logistics Tracking | Not available for Anonymous User | Not available for Anonymous User |
This navigation tab is available for the user assigned the Manager role and is used to upload prices from a spreadsheet into the Customer Advantage price tables. These tables are used to store prices that can be viewed from Customer Advantage. The Manager identifies the file name to be uploaded and then presses a button to perform the process. They are then able to review and correct any errors that may have occurred. When uploading prices for customers that are transportation companies, the spreadsheets must include the beneficial owner.